Brian Altman is vice president of sales and marketing at Altman Manufacturing.
Virtually every manufacturer recognizes the role that quality plays in establishing lasting, trusted relationships with its customers — an essential element that helps enhance its growth and long-term stability. Ensuring that level of quality, particularly in long-run, difficult-to-automate, component manufacturing and assembly operations often could be a daunting task, for which the only solution was throwing people at it.
For a long time, these manufacturers had to rely almost entirely on the manual inspection of these components. For an equally long time, machine vision inspection systems were costly, limited in capability and had uniquely developed software that was very difficult to configure, use or modify.
Now, as amazing as the human eye is, it's unreliable in repetitive work, especially when the work involves judging slight differences in size. To avoid the mistakes that workers are bound to make from time to time, most manufacturers today will rely on automation for their quality checks whenever they can.
Dare to Do the Difficult
Established in 1942 and headquartered in Lisle, Ill., Altman Manufacturing is a family-owned manufacturer of automation, fabrication and tool-and-die-cutting machinery that specializes in developing equipment and processes to mechanize and finish hard-to-automate products, including rubber and plastic goods without a defined geometry.
About three years ago, a customer that manufactures Elastomer rubber components for use in the medical industry approached Altman Manufacturing to develop a machine that it could use to automate its process to inspect finished products.
"To illustrate their challenge, our customer brought us three different products they produced: a seal, an item similar to an O-ring and a filter/seal combination," explains Paul Altman, Jr., who leads engineering at Altman Manufacturing. "While they were made of the same silicone material, the three products were different sizes, shapes and colors, and the filter, in particular, had holes that could easily be filled with excess silicone or flash during the manufacturing process. The customer wanted a system that would inspect these different parts, and also could scale to inspect any new parts they manufactured in the future."
While defective parts can be detected during manual inspections, the fact that any defective part might make it to assembly posed challenges for the customer, who could be back billed for any product that didn't work as promised.
Also read: 10 advantages of using vision to guide robots
The time and labor required to inspect products using the customer's existing manual system were costly; inspections were completed by workers who sat at inspection tables and manually checked the small parts — some of which were less than an inch in diameter — as they moved down a conveyor. Even the most efficient operator was only 87% effective, and because the manual inspection process was time-consuming and tedious, the effectiveness of the inspections often diminished in the last hours of each shift.
In fact, a typical inspector is 92% effective during the first hour and 80% effective thereafter. This forces many companies to implement a process in which inspections are staggered, and the same part is inspected multiple times by different inspectors, increasing inspection cost.
If a defective product is found, it could be reworked in the case of flash or overmold, or it might be discarded, for example, if it had a hole.
Seeing the "Proof"
The company has worked with virtually all providers of vision inspection systems, and Altman knew almost immediately which vision system would be the most effective for this application. "We choose the vision system that is best for the application, and what makes Teledyne Dalsa ideal for inspecting Elastomer rubber products are the company's unique algorithms, such as 'contour,' which is perfect for checking the edges of a rubber piece," Altman explains.
"Teledyne Dalsa also provides the flexibility to turn certain features, such as the area calculator, on and off as needed. For general inspections and finding flash, and because of the product's easy-to-use drag-and-drop functionality, we think this is the best vision system for this application."
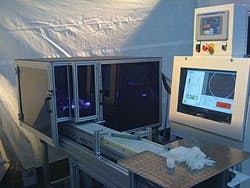
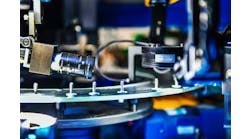
Figure 1: The inspection machine built for the medical-component manufacturer has eight high-resolution cameras and vision-application software. The system is set in advance based on which parts are to be inspected, and specific lighting schemes and camera zones are developed for each unique part.
Source: Altman
However, before any system is put into production, Altman evaluates the parts using a sample system for pre-production inspection that was developed with Teledyne Dalsa. Using the sample inspection system allows him to view different parts, and design appropriate lighting to ensure the camera delivers the optimum results.
"We use this pre-production process to create a customer presentation that illustrates how a product could be inspected given the technology available," Altman explains. "In production it points to the defect, describes how it was found and the algorithm we used, and explains how a defective part would be sorted. We can show customers how effective a solution will be before they order the machine, similar to a proof of concept. This ability is especially important when developing a vision system. Until we have a lighting scheme and know which lens will be used, we can't be sure if a solution will function as we expect. Working with Teledyne Dalsa to show customers difficult applications ahead of time has been very important to our business. Customers understand in advance what a vision system will do and how it will work, so there is no ‘vision creep,' that is, future requests for inspections beyond the capabilities of a machine."
Right Light, Right Camera, Right View
The machine Altman built for the medical-component manufacturer (Figure 1) uses Teledyne Dalsa's GEVA Vision Appliance, eight Genie high-resolution 1600 cameras and iNspect vision application software. The system is set in advance based on which parts are to be inspected, specific lighting schemes and camera zones that are developed for each unique part. For example, one part might require inspection using an overhead light, while another might need an under light, and a third could require a dark-field inspection. Each part and lighting scheme is also associated with a particular field of view, so one part will be inspected with cameras one, two and three, but a second part will be inspected with cameras one, four and six. To simplify an otherwise complex process, cameras are set so that no elaborate focus techniques are required.
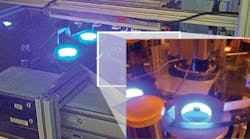
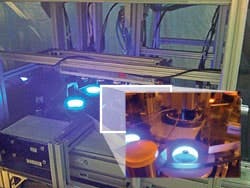
Since the machine can accommodate multiple parts, the parts are hand-fed by an operator, who places them on the belt. The machine then orients each part so that it moves under Camera One, which checks that the correct part is presented properly. As a part moves down the conveyor, it crosses on to a glass disk, and is viewed under the appropriate lighting scheme and with the designated camera regime (Figure 2). Images are then inspected using Teledyne Dalsa's iNspect software. If a part doesn't meet the pre-set requirements, it's discarded. The image of the defective part is stored so that the defect can be tracked, and a counter identifies into which bin the part was sorted and why.
Figure 2: The machine orients each part so that it moves under Camera One, which checks that the correct part is presented properly. As a part moves down the conveyor, it crosses on to a glass disk, and is viewed under the appropriate lighting scheme and with the designated camera regime.
Source: Altman
The vision system is integrated with other elements of the production process by an Ethernet connection. As data is compiled, operators can be notified quickly if the number of discarded parts meets a preset threshold, which might indicate an issue in the manufacturing process.
Parts that pass inspection are sent on to packaging or shipping. The customer produces only Elastomer rubber components, so finished parts are sent to a different facility for assembly.
"With this automated inspection system, our customer inspects more than 100,000 of the same type of part in each run and transitions seamlessly from part to part, inspecting as many as 20 different parts in a day," Altman notes. "Thanks to the efficacy of this vision system, the machine can inspect three parts per second with 99.97% accuracy, a rate of speed and accuracy that was unimaginable before." Altman is quick to add, however, that the real value of the vision system goes beyond the percentages: The most important consideration is whether or not the customer is able to identify as many defective parts as possible based on the algorithms and criteria they've defined.
Altman credits Teledyne Dalsa's GEVA Vision Appliance with ensuring the scalability of the solution. "The GEVA Vision Appliance enables the solution to be completely adaptable," he says. "We can incorporate eight different cameras for eight unique fields of view, but then choose which ones will turn on and when for a completely flexible implementation."
Even given the complexity of the solution overall, Altman notes that the iNspect vision application software simplified the design and deployment of the automated inspection process. "Customers do not have to be technically skilled to use it," he says. "The software works with real-world dimensions and drag-and-drop algorithms for an easy-to-use operator interface. We provide the original ‘recipe' and back-end script, so there is no need for an operator to have the expertise to write code. A user can easily switch from part to part, or create a scheme to inspect a new part using a previously scripted ‘blank' menu item and the drag-and-drop algorithms."
In fact, Altman says that while training for other types of programs could take weeks, the training for iNspect was completed in just over a day, and he was able to deliver a level of training that ensured that the operator he trained could train someone else.
In addition, the vision system requires minimal maintenance, just periodic cleaning of the lenses and optics. But if additional support is needed, the customer can reach out to either Altman or Teledyne Dalsa.
Flexibility for the Future
Altman never had any doubt that the Teledyne Dalsa solution was ideal for this application, but his confidence was proven again after the equipment had been in operation for more than two years. "This vision system was ideal in that it allowed us to incorporate multiple cameras and gave us the ability to control them with easy-to-use software," he notes.
"Recently, the customer needed to inspect a completely different and unique part, a slit in a Duckbill (check valve), and they were able to set up the appropriate lighting scheme and fields of view on their own — without any help from me. They're highly satisfied with the solution, and the results are proven. Eliminating manual inspections alone has led to a significant return on investment, and the speed and accuracy of the new equipment has increased productivity rates overall. Plus, we've demonstrated that the solution can scale to meet all their future demands."

Leaders relevant to this article:
