Bhaskar Ramakrishnan, technical sales engineer at DWFritz Automation, will be giving a presentation on why inspection is critical to automation, as part of the Automation Fundamentals session on April 4 from 11 am to 12:30 pm at Automate 2017 in Chicago. Ramakrishnan has 12 U.S. patents and holds a DFLSS Black Belt from Xerox. He received his MSME from the University of Connecticut and an MBA from the University of Kentucky. Contact him at [email protected].
Samsung’s recent Note 7 battery fiasco underscored just how essential inspection is to automation and why omitting it can have dire consequences. The cause of the Note 7’s exploding batteries was the incorrect assembly of the battery component. To prevent this from happening again, Samsung announced it will be inspecting all of its batteries in future products. Samsung not only lost billions of dollars in this debacle, but it may have damaged its brand. By investing in quality inspection technologies beforehand, this entire scenario could have been avoided.
What is inspection? Inspection in automation can be defined as the comparison of a measurement to a desired baseline. Inspection can be applied to incoming materials, during the production process or to finished goods. Inspection can be either qualitative—is there a component missing from the assembly process?—or quantitative—is the diameter of a pin correct? It can be performed by a human or by machines. The intent of inspection is to either accept or reject the part being examined, based on defined criteria. There are two types of inspection processes: sampling and 100% inspection.
Sampling takes into account a subset of the entire lot being examined and doesn’t measure the quality of the whole. It’s used where the risk of rejecting good parts or accepting a bad part doesn’t affect the end user or manufacturer catastrophically. The sampling method is generally applied to low-cost products such as bulbs or switches, where precision has less importance. By contrast, with 100% inspection, each individual unit or component is examined to determine specification and quality compliance. It’s usually more expensive and can become tricky when non-destructive testing isn’t possible. Another issue with 100% inspection is that it could add a part-touching step increasing the probability of contamination or cosmetic defects.
Market needs
The need for 100% inspection is driven by the particular requirements of the industry. It’s adopted more often when human life could be jeopardized or safety assurances are needed. This is the theme prevalent in the medical and automotive industries. Government regulation in these two industries drives the majority of the need for 100% inspection. In the medical space, government regulation maintains strict scrutiny of Class III medical components. Any issues with sterility can lead to product recalls and sometimes even the loss of a trading license. In the automotive market, the Corporate Average Fuel Economy (CAFE) standards have driven manufacturers to produce parts with tight tolerances. Failure of these parts to conform to the tolerances leads to recalls and warranty costs, thereby affecting both the brand name and the revenue.
Cosmetics is another common reason why manufacturers in the automotive and consumer electronics markets opt for 100% inspection. Since consumers often associate prestige with the type of automobile they drive or phone they carry, great importance is given to the appearance of these items.
Yet another reason is rapid commoditization, particularly in the consumer electronics industry, which drives manufacturers to maximize yields. By measuring part quality and passing the information upstream, those upstream processes can improve the product or the process yields in real time. Another important factor in the consumer electronics industry is the drive for miniaturization. A 3-sq-in area within a cell phone contains hundreds of components. These components measure just a few millimeters in dimension and have to be placed within a few tens of microns relative to each other. Both missing and confirming placement accuracies are also drivers for 100% inspection.
Inspection selection
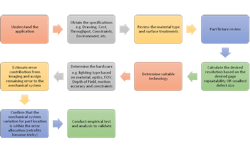
The 100% inspection-system selection process starts with understanding the application—knowledge of upstream and downstream processes—and obtaining the specifications (Figure 1). One of the key factors for vision inspection is understanding the surface treatment of the part to be imaged. For example, some parts may have cosmetic surface finishes or functional clean areas that aren’t available for handling. This needs to be understood during the part fixture review. Reliably identifying the defect or obtaining repeatable measurements is important for selecting the appropriate technology and hardware. Once the technology and hardware are determined, the gage reliability and reproducibility (R&R) is decided. The error contribution for imaging the subsystem is estimated, and an appropriate mechanical subsystem is designed to be within the remainder of the gage measurement variation error. After theoretical verification is complete, an empirical test with the actual part needs to be conducted to validate the system.
Figure 1: The 100% inspection-system selection process starts with understanding the application—knowledge of upstream and downstream processes—and obtaining the specifications.
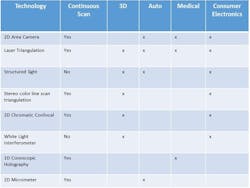
There are several options for selecting the most appropriate inspection technology for the particular application at hand. While not an exhaustive list of all machine vision technologies available, a few of these technologies are listed in Table 1. Alternate technologies to machine vision exist; however, we do not discuss them here as they are not as prevalent as vision. Column 2 in Table 1 indicates whether the part needs to be paused during the manufacturing process to acquire the measurement image or not. The third column indicates whether it is a 3D technology or not. The next three columns list whether the technology is widely used in each of the three industries. A high level summary of the 3D inspection enabling technologies is discussed below.
Table 1: This is not an exhaustive list of all machine-vision technologies available.
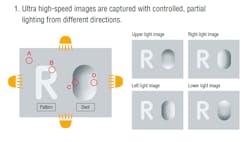
The 2D area camera with directional lighting technology provides a pseudo-3D result. The directional lighting method essentially takes four synchronized images, while illuminating from the four quadrant directions (Figure 2).
Figure 2: The directional lighting method essentially takes four synchronized images, while illuminating from the four quadrant directions.
(Source: Keyence)
The shadow cast by dents and bulges from each of the four directions is analyzed. Each of these pictures is taken with strobe lighting without stopping the part. Once the images are obtained, image algorithms are applied to extract the dents and bulges (Figure 3).
Figure 3: Once the images are obtained, image algorithms are applied to extract the dents and bulges.
(Source: Keyence)
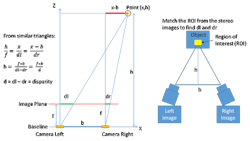
In stereo line-scan triangulation, a white line is cast on the part and two stereo cameras capture the image of the part simultaneously (Figure 4).
Figure 4: In stereo line-scan triangulation, a white line is cast on the part and two stereo cameras capture the image of the part simultaneously.
The two images are pattern-matched around the region of interest (ROI). Applying the resulting difference in the two images, the triangulation method solves for the height. This method is accurate in lateral and height directions; however, it requires that the part have texture and sharp features. Transparent and specular objects are not good candidates for this technology.
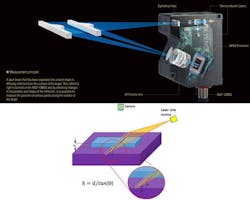
Figure 5: The working principle and the internals of a triangulation sensor are shown.
(Source: Keyence)
Laser-triangulation instruments are widely used in several industries. An imager captures the laser line scanning the part. Height information is extracted based on the laser line deformed by part geometry and features.
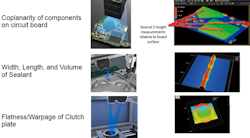
By stitching lateral and height information of each line a 3D point cloud of the object is obtained. Figure 5 shows the working principle and the internals of a Keyence triangulation sensor, and Figure 6 shows a few applications.
ALSO READ: How to get started with robotics
Figure 6: Applications of the laser-triangulation method are shown.
(Source: Keyence)
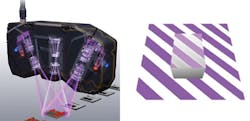
The structured light device has two laser light sources and one camera (Figure 7).
Figure 7: The structured light device has two laser light sources and one camera.
(Source: Keyence)
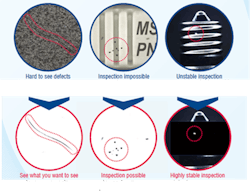
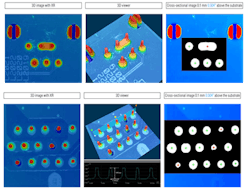
The laser interference method works with two wide planar laser beam fronts. Resulting interference between the two wide planar light sources forms regular, equidistant line patterns on the work piece, which is then used to understand features in 3D space. The structured light method obtains good resolution images in lateral and height measurements; however, it doesn’t work well on transparent and spectral objects. Figure 8 shows a few applications of this device in the solder operation. Note that traditional 2D vision tools, such as count, area and aspect ratio, can also be applied.
Figure 8: Some applications of the structured-light device in the solder operation is shown. Traditional 2D vision tools, such as count, area and aspect ratio, can also be applied.
(Source: Keyence)
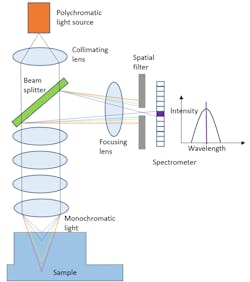
In Chromatic Confocal technology, an optical probe spreads the focal length of the polychromatic (white) light source over a discrete number of points, creating a full spectrum of light (Figure 9). Based on the wavelength and intensity of the reflected light collected via the special filter, a very precise distance measurement can be taken several times per second. With this technology, it’s possible to measure nearly all materials such as glass, metal, leather, paper and even liquid.
Technologies enable capturing 3D information of the object for use in 100% inspection. Depending on the application challenges, there are several alternate technologies that may be considered such as an interferometer, acoustic, X-ray or thermal, to name a few. As technologies improve over time, engineers should keep track of alternative offerings to machine vision. Production volume, physical size, cost and application of the component or product drive the need for 100% inspection. Before selecting the technology to inspect 100% of the parts, other than evaluating the gage repeatability, engineers should also consider cost, cycle time, reliability and other factors that affect the business case.
Figure 9: Technologies enable capturing 3D information of the object for use in 100% inspection.
Like the medical proverb about an ounce of prevention being worth a pound of cure, the 1:10:100 rule is a good reminder why quality management during manufacturing is vital. The 1:10:100 rule tells us that costs compound over time, so it is actually cheaper to prevent a problem at the development stage than it is to correct it later on at the quality control stage, or worse, once it has been manufactured and sold. Inspection solutions suited for every phase of manufacturing are available, yet the frequency of medical-device product recalls and automobile recalls has been increasing.
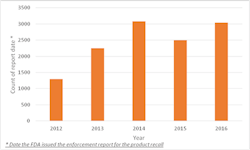
Enforcement reports for product recalls more than doubled between 2012 and 2016, according to the U.S. Food & Drug Administration (Figure 10).
Figure 10: Enforcement reports for product recalls more than doubled between 2012 and 2016.
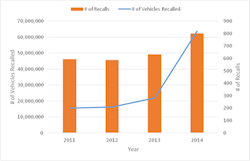
And the number of vehicles recalled between 2011 and 2014 more than tripled, according to the National Highway Traffic Safety Administration (Figure 11).
Figure 11: The number of vehicles recalled between 2011 and 2014 more than tripled.
With the increased adoption of manufacturing automation combined with the availability of technologies to support 100% inspection, there is now an opportunity to fix the issues before they reach the consumer and prevent a fiasco such as one that happened to the Samsung Note 7.

Leaders relevant to this article:


