How to develop reliable vision applications
They might say it’s about quality, but it’s really about money.
The reason why parts and assemblies are inspected is because passing bad parts on to a customer costs the manufacturer money. To that end, the point of putting a sensor on a manufacturing line is to drive cost out of the process or improve product quality and therefore value, and occasionally public safety is the driving factor.
Vision systems often replace human inspectors or enhance the inspection capabilities of the human. They are also often used to perform inspections unsuitable for humans and improve safety in harsh environments. Cameras don’t get tired. They can see things the human eye can’t and see things the human mind won’t.
Some folks suggest that a vision system is just a camera and a computer program. These people are not my favorite suppliers or customers. A machine vision system is automated optical inspection.
The camera is just an image sensor. It needs a lens. The lens must have the proper magnification and resolution to provide the maximum amount of information to the computer. The lens format size needs to be similar to the image sensor format and size, and the resolution of the lens must be sufficient for the size of the pixel in a camera. Some cameras have pixels that are 1.2 microns. Traditional optics, according to the Rayleigh Criterion, can only resolve 3 microns with visible light. In many cases, any old lens will do, since there are way more pixels than needed to verify the presence or absence or of a part; however, when gauging is involved, the lens must be carefully matched to the sensor. Having a trusted lens supplier is a good starting point. Testing the lens and camera in combination is an important next step.
Of course, a great lens and good sensor will only go so far; the lighting must be controlled. Some folks try to get away with ambient lighting; it’s a factory, after all, and the lights are on 24/7 and should be the same all the time, except individual bulbs burn out, and there is that one time of year where a beam of sunlight shines at just the right angle to cause all the parts to be rejected. So, we add lights—bright lights that overwhelm ambient—to the vision system. Sometimes color filters can be used to further isolate the camera illumination from ambient.
Strobes can be a very effective tool. They provide the ability to freeze the motion of moving or vibrating parts, enabling the image sensor to acquire a sharper image for inspection.
Sharp images are important. Proper image registration is important as well. The camera must be mounted securely. A vision system needs rigid mounting hardware, and it is good design practice to provide mounts that allows removal and replacement of the camera without requiring changes to the program other than typical calibration functions.
Don’t forget the output
A vision system must communicate the result of its inspection to an operator or some controller that knows what to do with the information. The information can be discrete, such as pass/fail, a number representing quality for bin-sorting purposes or a measurement, for example. The data can be the toggle of a single bit, a polled register in a Modbus PLC chain, or an integer or floating point value communicated via a real-time industrial Ethernet protocol, to name a few methods. For an operator, it can be a simple light or an audio cue.
Sometimes, the output needs to be more sophisticated than simple I/O; it might need to be tied into a relational database where analytics are performed on that inspection and all the others, for an overall process view. Open-platform communications (OPC) is a common method for large data back ends.
The vision system may still need some bells and whistles. Process requirements may mandate that it change inspection algorithms as different parts get rolled down the assembly line. The inspection algorithm will in turn control lighting for optimal inspection. The camera may be mounted on a robot and take multiple views of a part or assembly. Each image requires a different set of inspection tools. Then the result data can be fused to create a final quality score.
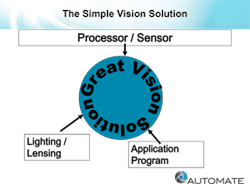
Figure 1: There are three major components to a vision system—processor/sensor; lighting/lensing; program/interface. Just like a three-legged stool, if one of the legs is weak, the whole thing can falter.
It’s pretty clear that inspection systems can become quite complex. There are three major components to a vision system—processor/sensor; lighting/lensing; program/interface (Figure 1). Just like a three-legged stool, if one of the legs is weak, the whole thing can falter.
While the three legs of the stool are important, the system must be accepted, even embraced, by the folks on the shop floor. The voice of the end user is important when developing a system. If the shop-floor folks don’t like your shiny new inspection system, it can mysteriously stop working. Getting direction from the plant manager is all well and good; management does pay the bills, after all. But getting buy-in on the floor, usually with a good back-and-forth with the end users, can be priceless.
The system must be easy to use, maintain and modify, in case of production changes. And it must be immune to ambient lighting, temperature, pressure, electrical fluctuations and weather.
The user interacts with the vision system via software. For some systems, the interface is invisible. The customer only sees a data stream that carries the desired information, such as whether the part is too big, too small, too bright, extra or missing.
Don’t think of the inspection system as a machine vision system. Think of it as a sensor—better yet, a sensor that the plant electrician can pull off the shelf in a store room, install on the line, program with a screwdriver or a pushbutton, plug into a PLC and get on with his job.
Since cameras are not quite that smart yet, inspection systems require a skilled operator to keep running. That skilled operator will be lucky to be adequately trained, so the interface should be easy to follow by the guy on the shop floor, not just by the guy that wrote the program.
ALSO READ: Vision takes control
See through the haze
Factories can be nasty places. A dirty lens can alter measurements. Oil and water have optical properties that can confuse a camera. Make sure there is a means to validate the installation on a regular basis. An automatic self-check is a great idea. Make sure there is a procedure in place to clean the optics. Use solid mounts for the cameras and lights. Use mechanical pins or other methods in order to keep the camera and lighting where they belong.
Here are a few helpful rules of thumb for your vision system:
- The more the part position can be controlled, the more the resolution can be optimized—that is, the smaller the field of view, the better.
- Ambient light is bad. Use baffles, shields, filters or strobes to eliminate or greatly reduce ambient lighting.
- For measurement applications, have a resolution of at least five to 10 times better than the tolerance. Normally, use 10, but some applications are fine with five.
- Realize what is really important to inspect.
- Don't take the simple road and use an algorithm just because it's easy to use; use the one that stands up to variability in environment and process.
- Any piece of equipment or process needs to be owned. All too often, a machine vision system is installed and left on its own. Bad things can happen when a system is not owned. A person can own several vision systems in a facility and become the local vision expert.
- If you need real-world units, need to account for geometric distortion or subject brightness, calibration is essential.
- Keep good notes about how the system works. You may be asked to change it in a year or two or 10. Worse yet, you may have to modify code your predecessor wrote. Better hope they kept good notes.
- Make sure there’s adequate documentation to keep the system running and make any user adjustments.
Everyone should have a “what if” list. How does your system respond to different failure modes? Let a total stranger run the inspection system. If you ever have to say, “Don’t do that,” there is something wrong. What happens if the power plug is pulled? What happens if the power plug is pulled as the system is booting up? Try it the next time you are halfway through the boot. What happens if the hard disk fills?
Cameras have resolution in bit depth. Most cameras can reliably differentiate intensity differences to one part in 256 (8 bits). Ideally steps would be linear.
Resolution is not just x and y. It’s a good idea to test your cameras for dynamic range. Just because a camera has a 12-bit analog-to-digital (A/D) converter does not mean that it puts out 12 bits of useful data.
Simulate failures. Take the set of known defects and good parts and run them through the system until the results are satisfying. Use your image manipulation tools to make a library of simulated defective parts.
The system should be capable of capturing images for off-line analysis; these can be every part, a statistical part sample or triggered on some inspection criteria. Bad parts are also a worthy capture target.
Always design your system to run off-line from a library of images. The off-line program can be used to review production images and develop improved inspection algorithms, without being at the production/inspection site. Some plant managers like to be able run the inspection in a cubicle or on a desktop.
One manufacturer wanted to find 50-micron defects in plastic sheets. The system worked great. It was built with close collaboration of the customer’s quality-control department. The system was used to find the root cause of 50-micron defects. The root cause was then eliminated by manufacturing with the help of the inspection system.
Suddenly, the problem was 10-micron defects. Had I foreseen the future, I would have suggested a 10% bump in cost and a higher-resolution system. The system was robust, but the customer ended up spending a lot of money to upgrade the software. A hardware upgrade was not feasible because it would have required a major rebuild of the system. In the end, the system was good enough to detect the new class of defects.
The lesson: Assume your customer’s needs will change, and work to build in some flexibility to meet that change.
It turns out that being a machine vision expert requires broad spectrum of talents, so it’s great to have a team behind you. Many disciplines are part of a successful machine vision implementation:
- mechanical engineering
- design engineering
- software engineering
- vision engineering
- lighting engineering
- sourcing
- technical writing.
Plugging a camera into a computer can be a compatibility nightmare if both do not recognize the same standards. Be aware of:
- GigE Vision
- Camera Link
- EMVA 1288
- Camera Link HS
- USB3 Vision
- CoaXPress
- GenICam
- Lens MountStandards by JIIA.
- If you train on good parts, how do you know what a defect really looks like?
- Is 10 defective parts a sufficient sample quantity to train on?
- Will the ink color on a fiducial mark or color of silk screen on a PCB change in six months to a year, causing the inspection system to reject all of the parts from a new second-tier supplier?
- Will operators be trained properly on the equipment?
- What is the real end goal of the vision system?


