Keyence IM Series Inspects More Timex Parts in Less Time
The tolerances and accuracies are 15 µm for concentricity and ± 10 µm for center-to-center spacing and distances, according to Keyence. There are at least five critical points per part.
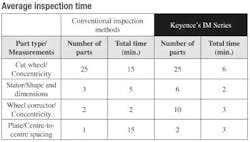
"With conventional inspection equipment, measurements took too long," said Scotto. "As a result, we couldn't measure many parts and there was a risk of overlooking significant variations within batches. Before obtaining the IM Series, we used a variety of equipment. Our optical measuring device, which although very accurate, is not very practical for quick measurements on a daily basis. Furthermore, it requires a high level of skill to operate. The shop microscopes provide accurate measurements, but are tricky to operate and severely limit the number of measurements and parts. In addition, a reference point for truing-up has to be created. Lastly, due to the sometimes long inspection times, our templates and projectors allow only limited number parts to be measured and there is a risk of misinterpretation."
"The IM Series is simpler to operate, saves time and eliminates variations of interpretation of measurements," said Scotto. "Results are conveniently displayed green (for good) or red (for bad). Keyence's solution allows several parts to be measured simultaneously. The size of the parts and the number of elements making up the program are the only limits. There is no need for manual truing-up because the system does it all by itself by recognizing each part's geometry. Furthermore, results can be saved and statistics tracked. Part profiles can be compared against master profiles imported from CAD files. As a result, we no longer need to position templates on parts and measure differences in shape by eye. The machine does so automatically and extracts an image of the contour showing the difference with the tolerance. All in all, measurements are fast and do not require special skills."
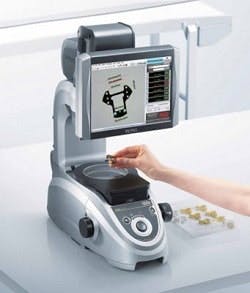
IM-6500 Series measures features in little to no time and easily by simply placing a target on the stage and pressing the button. In just a few seconds, up to 99 points can be measured with a ± 1 micron repeatability. There is no risk of measurement affected by an operator's skill level and targets can be measured no matter what their position or orientation. With the systems iPASS shape detection, position and target angles are measured automatically.
"Getting to grips with the system was easy because all you have to do is adjust the focus and load the program for the part being inspected," said Scotto. "All the QC technicians in the Quality Department use the machine for final inspection of parts before their placement in stock. The operators in the cutting shop also use it to measure certain parts during production. The programming is completely user-friendly. The faster inspection times enable us to track dimensions better and thus improve the quality of a large number of the parts we deliver. What’s more, we haven't received a single complaint from clients about any of the parts measured on the machine. For example, we use Keyence’s IM-6500 to inspect the concentricity of every single cut wheel and automatically record the measurements."


