Hurco Manufacturing accelerates machine tool assembly checks
The ultimate accuracy and reliability of a machine tool depends in no small degree on the alignment checking during its assembly. For machine tools produced in high volumes, the efficiency of the alignment-checking process is paramount.
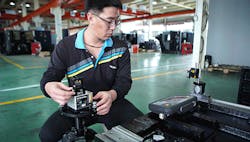
Hurco Manufacturing is a provider of CNC machines, producing thousands of machine tools every year. We needed machine measurement and alignment to be highly accurate and faster. To increase both precision and throughput, Hurco chose to adopt the XK10 alignment laser system from Renishaw, which can be applied to linear rails to ensure they are straight, square, flat, parallel and level, as well as to spindles and chucks to assess direction and coaxiality of rotary machines (Figure 1).
Also read: CNC builders look to software, machine-health data, customization and modular design
The XK10 alignment laser system succeeded in significantly reducing the amount of time we needed to implement high-accuracy machine tool alignment. After testing the XK10 system repeatedly, we found that it provided a solution that is genuinely capable of replacing traditional methods.
Figure 2: Hurco Manufacturing was established in Taiwan in 1999 and is today responsible for the manufacture and assembly of the complete range of Hurco machine tools.
Background
A true pioneer in the application of computer technologies in machine tool design, Hurco is a global provider of CNC machines. Founded in Indiana in 1968, the company manufactures a comprehensive range of products including five-axis CNC machines, multi-axis CNC lathes, vertical machining centers and turning centers.
Our worldwide customer base comprises precision tool, die and mold manufacturers, independent job shops, specialized short-run production manufacturing companies and OEMs of metal fabrication tools. Our product portfolio includes three well-known brands: Hurco, Milltronics and Takumi.
Hurco Manufacturing was established in Taiwan in 1999 and is today responsible for the manufacture and assembly of the complete range of Hurco machine tools (Figure 2). To ensure requirements for machine tool precision, safety and reliability are met, strict quality control is paramount for each step in the manufacturing process.
Challenges
With Hurco producing thousands of machine tools every year, increasing measurement efficiency was a vital driver for our inspection and verification processes. Not only did machine measurement and alignment need to be highly accurate, but it also needed to be faster.
Alignment inspections during the assembly process were carried out by using a blend of traditional measurement tools, coordinate-measuring machines (CMMs) and calibration equipment. We had long employed a range of Renishaw solutions, including the XL-80 laser interferometer, QC20-W ballbar system and XR20-W rotary axis calibrator.
The sheer size and scale of cast machine-tool components presented significant restrictions for CMM solutions, while the inherent weaknesses of traditional measurement techniques risked limiting operational performance. In the past, we have measured and aligned our cast products using coordinate-measuring machinery, but the larger dimensions of cast parts were always a limiting factor and made it rather labor-intensive.
We would also use traditional error-checking tools such as granite squares, dial gauges and autocollimators during the assembly process, but these were never efficient enough, and the measurement results were too inconsistent.
When we needed to measure the parallelism of some large cast parts, if the granite square and guide rail are a distance away, then the dial gauge needed to be extended to reach the granite, which would then cause any deviation result to amplify.
We set the task of identifying a more accurate machine tool alignment solution—one that’s less time- and labor-intensive to set up and use and that could replace the traditional measurement methods.
Solution
Following extensive research and testing, I was interested in the XK10 and asked for an on-site demo, which was satisfactory. We chose to adopt Renishaw’s XK10 alignment laser system for its effectiveness in 2019.
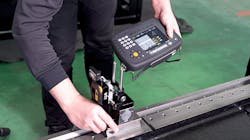
An all-in-one digital measurement solution suitable for a range of different CNC machine tools, the XK10 comprises a launch unit for primary laser transmission; wireless transmitter and receiver units; a portable display unit and a fixturing kit. An additional XK parallelism kit carries out parallelism measurements.
Figure 3: The display unit enables the operator to collect, analyze and record measurement data.
The XK10 is used on straightness and parallelism for linear guideway assembly and quality control at the production site.
The XK10’s compact size, wireless connectivity and versatile fixturing means that it can be used in many different configurations, enabling detection and measurement of both geometric and rotational errors across all types and sizes of machine tool.
The display unit enables the operator to collect, analyze and record measurement data (Figure 3). It provides step-by-step instructions for each type of measurement, with intuitive graphics and real-time readings guiding the operator through each stage of the measurement process.
Unlike an autocollimator, which depends on the principle of converting angular measurements into linear measurements, the XK10 alignment laser system takes linear measurements directly, thereby removing the inherent conversion error. Importantly, breaking the XK10’s laser beam during data capture does not require a complete restart, unlike with a laser interferometer solution.
Results
The XK10 alignment laser system succeeded in significantly reducing the amount of time we needed to implement high-accuracy machine tool alignment. After testing the XK10 system repeatedly, we found that it provided a solution that is genuinely capable of replacing traditional methods.
As a conservative estimate, I’d say that Renishaw’s XK10 alignment laser system has at least doubled our overall measurement efficiency, and our evaluation process has proven that the measurement results tally precisely with those from high-precision coordinate measuring machines.
With a generous measurement range of 30 m, the XK10 handles the requirements of many large machine tools. Negotiating the span between guide rails for parallelism measurements has become easy, removing the need for large granite squares and avoiding the deviation risk of hyper-extended dial gauges.
The XK10 has particularly impressed us in terms of the parallelism measurement between two measurement rails. Compared to autocollimators, setting up the XK10 for multiple rail measurements is much simpler. We align the laser unit and turn the laser beams through 90° with the XK parallelism kit. The system then automatically analyzes the data collected and provides us with measurements of the parallelism between the two rails. It couldn’t be easier.
By replacing various sizes of granite squares, the XK10 has also solved the problem of limited storage space and logistics. Thanks to its portability and flexibility, it is easy to take to site, performing precision measurements in real time. It is used for machine tool assembly, calibration and maintenance, and by enabling better understanding of the status of each CNC machine, resources can be allocated more effectively.
About the author
Wang Shun-Chien is executive vice general manager of Hurco Manufacturing in Taichung City, Taiwan. Contact him at [email protected].


